
A ratio spread buys one option and sells two (or more) further out-of-the-money options of the same type and expiration. It comes in two mirrored versions: the call ratio spread, built with calls for a moderately bullish view, and the put ratio spread, built with puts for a moderately bearish view. Both trade a defined, favorable profit zone against an uncapped risk beyond it – understanding that trade-off is the whole point of this guide.
A Quick Refresher: What “1×2” Means
A simple vertical spread buys and sells one contract each – the same quantity on both legs, which keeps the risk defined on both sides. A ratio spread breaks that symmetry on purpose: it buys 1 contract closer to the money and sells 2 contracts further away. The extra short contract isn’t covered by anything, which is what creates the uncapped risk beyond the second strike – and also what pays for the position, often turning it into a net credit.
Call Ratio Spread – Structure
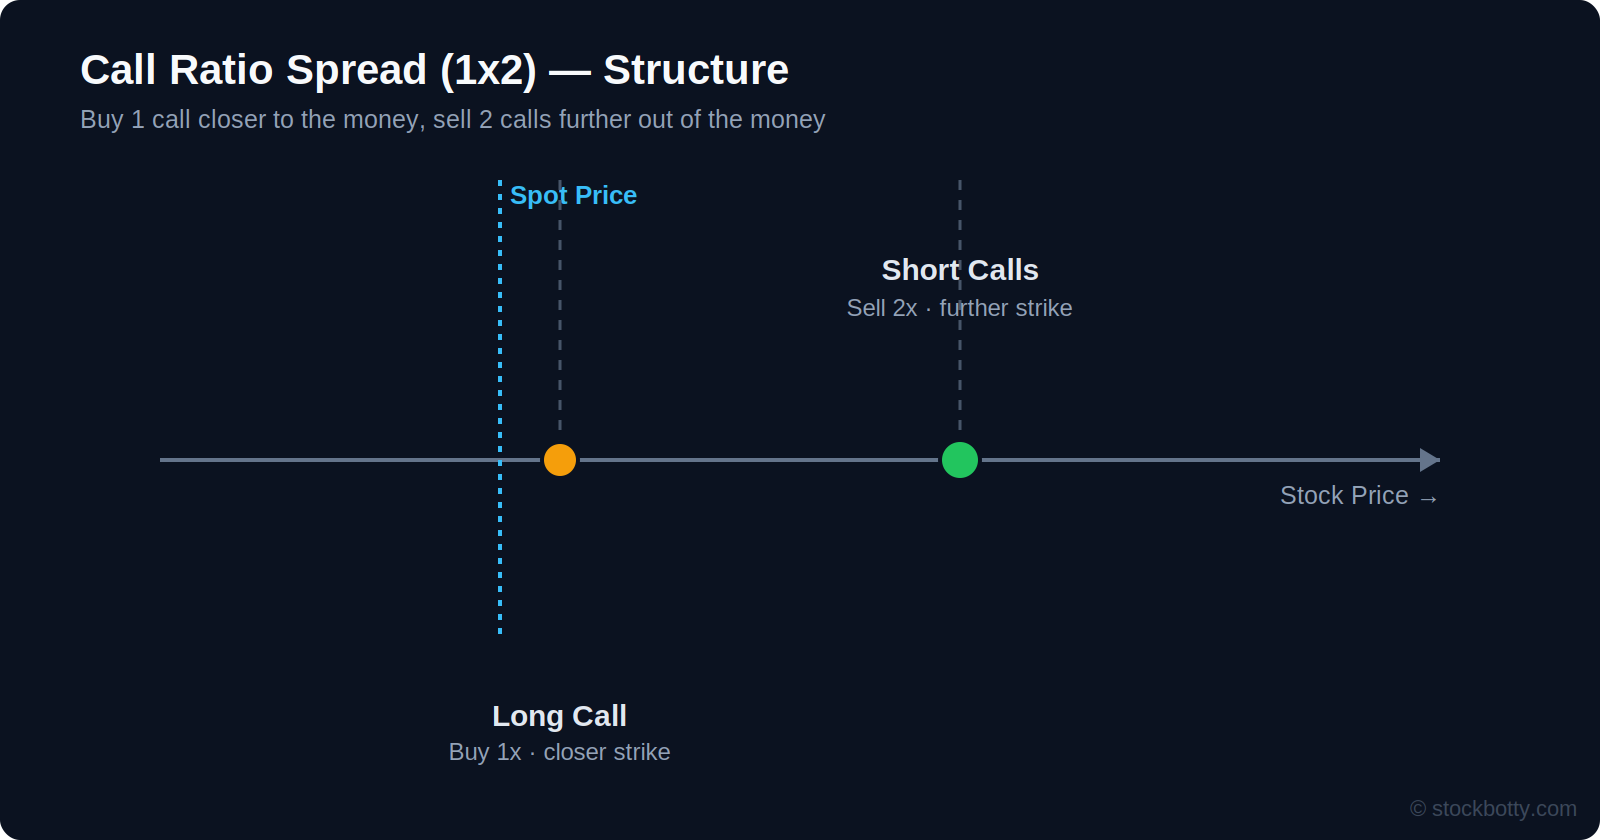
Buy 1 call at a strike closer to the current price, and sell 2 calls at a higher strike, same expiration. The 2 short calls generate more premium than the 1 long call costs, which is why this can often be opened for a net credit or close to cost-neutral.
Call Ratio Spread – Payoff at Expiration
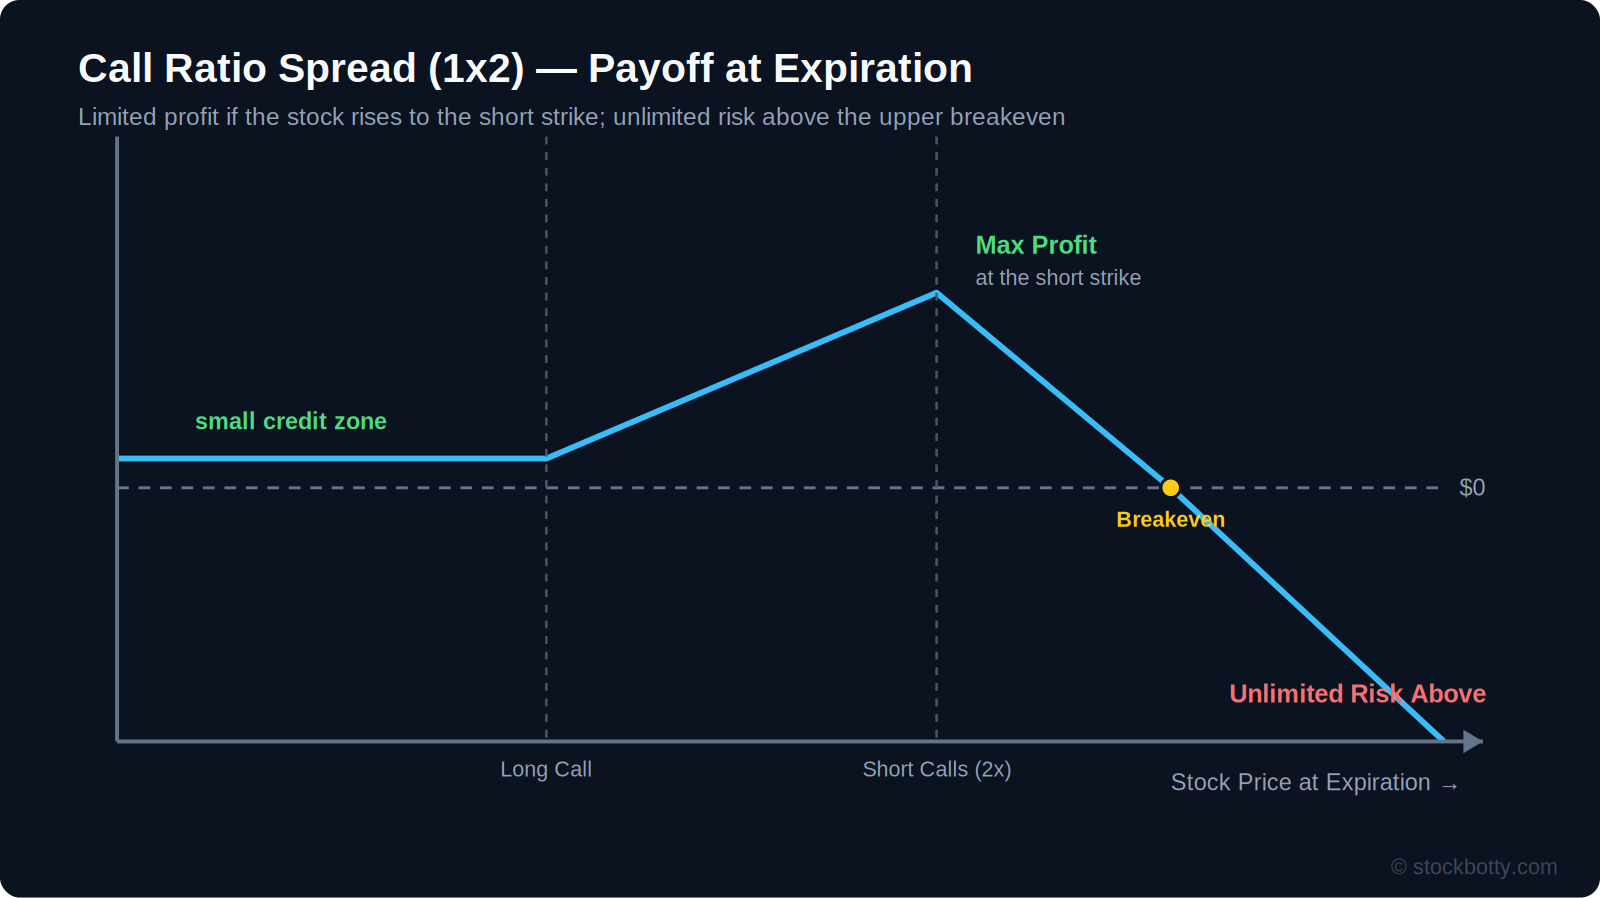
Below the long call strike, both legs expire worthless and the position keeps the small credit (or loses the small debit). Between the two strikes, profit grows as the stock rises, since the long call gains value while the short calls stay out of the money. Profit peaks exactly at the short strike. Above that, the extra uncovered short call takes over: losses grow without limit as the stock keeps climbing.
Put Ratio Spread – Structure
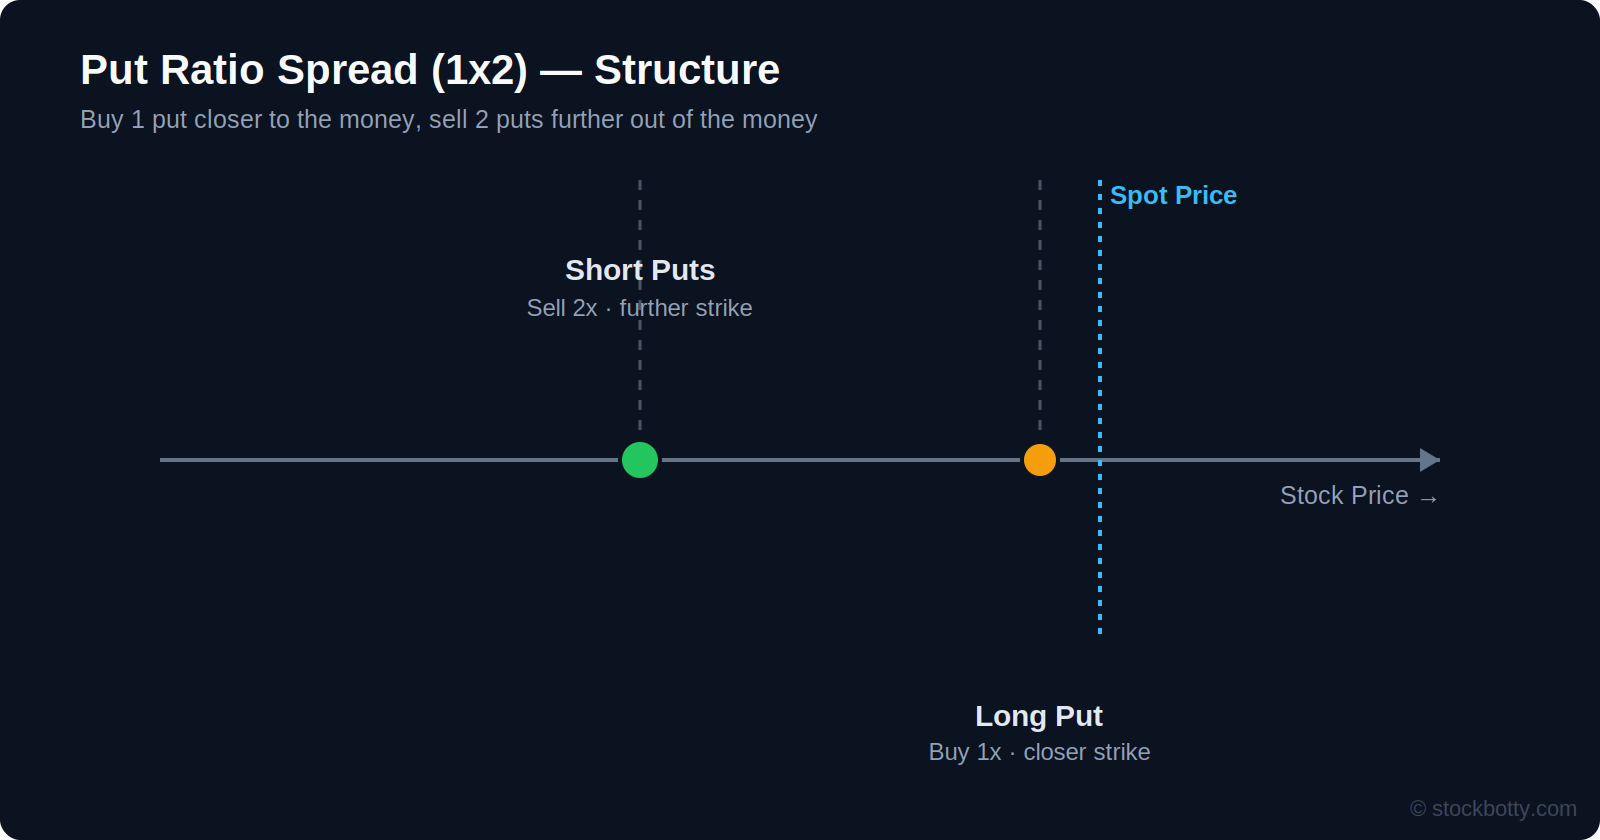
The mirror image: buy 1 put at a strike closer to the current price, and sell 2 puts at a lower strike, same expiration. Same logic as the call version – the 2 short puts generate more premium than the 1 long put costs.
Put Ratio Spread – Payoff at Expiration
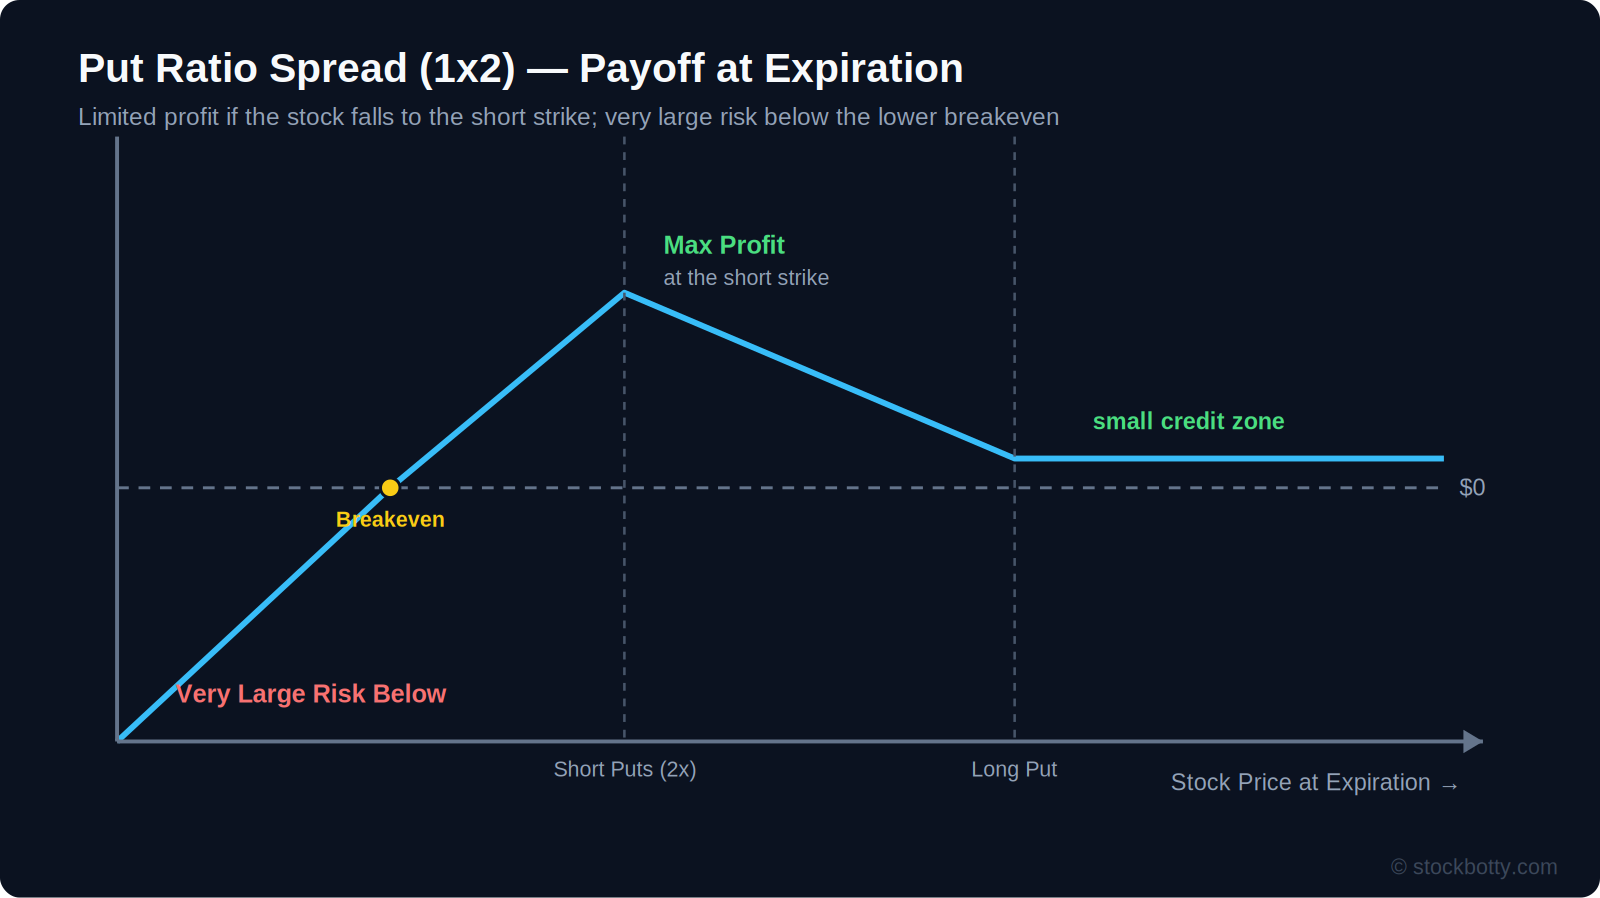
Above the long put strike, both legs expire worthless and the position keeps the small credit. Between the two strikes, profit grows as the stock falls, peaking exactly at the short strike. Below that, the extra uncovered short put takes over: losses grow rapidly as the stock keeps falling, technically bounded by zero but large enough in practice to be treated as effectively uncapped when sizing the trade.
Choosing Strikes and Expiration
- Aim for a net credit: many traders specifically construct ratio spreads to be cost-neutral or a small net credit, rather than paying a debit for a position that carries uncapped risk. A credit means the worst case on the safe side of the trade still leaves a small profit instead of a guaranteed loss.
- Strike distance: the two strikes are often kept relatively close together (a small percentage of the stock price apart) to keep the maximum-profit zone realistic and the premium collected on the short strikes meaningful relative to the long strike’s cost.
- Days to expiration: similar to other premium-focused strategies, 30-45 days is common, balancing theta decay against the growing gamma risk near the short strikes as expiration approaches.
When to Enter a Ratio Spread
- Call ratio spread: used when moderately bullish – expecting the stock to rise toward the short strike but not sharply beyond it. A big, fast rally is the losing scenario.
- Put ratio spread: used when moderately bearish – expecting the stock to fall toward the short strike but not sharply beyond it. A big, fast decline is the losing scenario.
- Elevated implied volatility: since the position is net short more options than it’s long, it generally benefits from IV contraction on the short strikes, similar to other premium-selling strategies.
Managing the Trade: Defending the Uncapped Side
Because the risk beyond the short strikes is open-ended, ratio spreads are usually managed more actively than defined-risk structures like an iron condor.
- Close or roll early once the stock approaches the short strikes, rather than waiting to see whether it breaks through – the point of maximum profit is also the point where the uncapped risk begins.
- Cap the tail risk by buying a further option beyond the short strikes. This converts the ratio spread into a butterfly- or condor-like structure with defined risk, at the cost of some of the credit collected.
- Convert to a covered position – on a call ratio spread that’s being tested to the upside, some traders buy the underlying stock against the extra short call, turning it into a covered call on that portion of the position.
The Line Lifts Over Time (T+0)
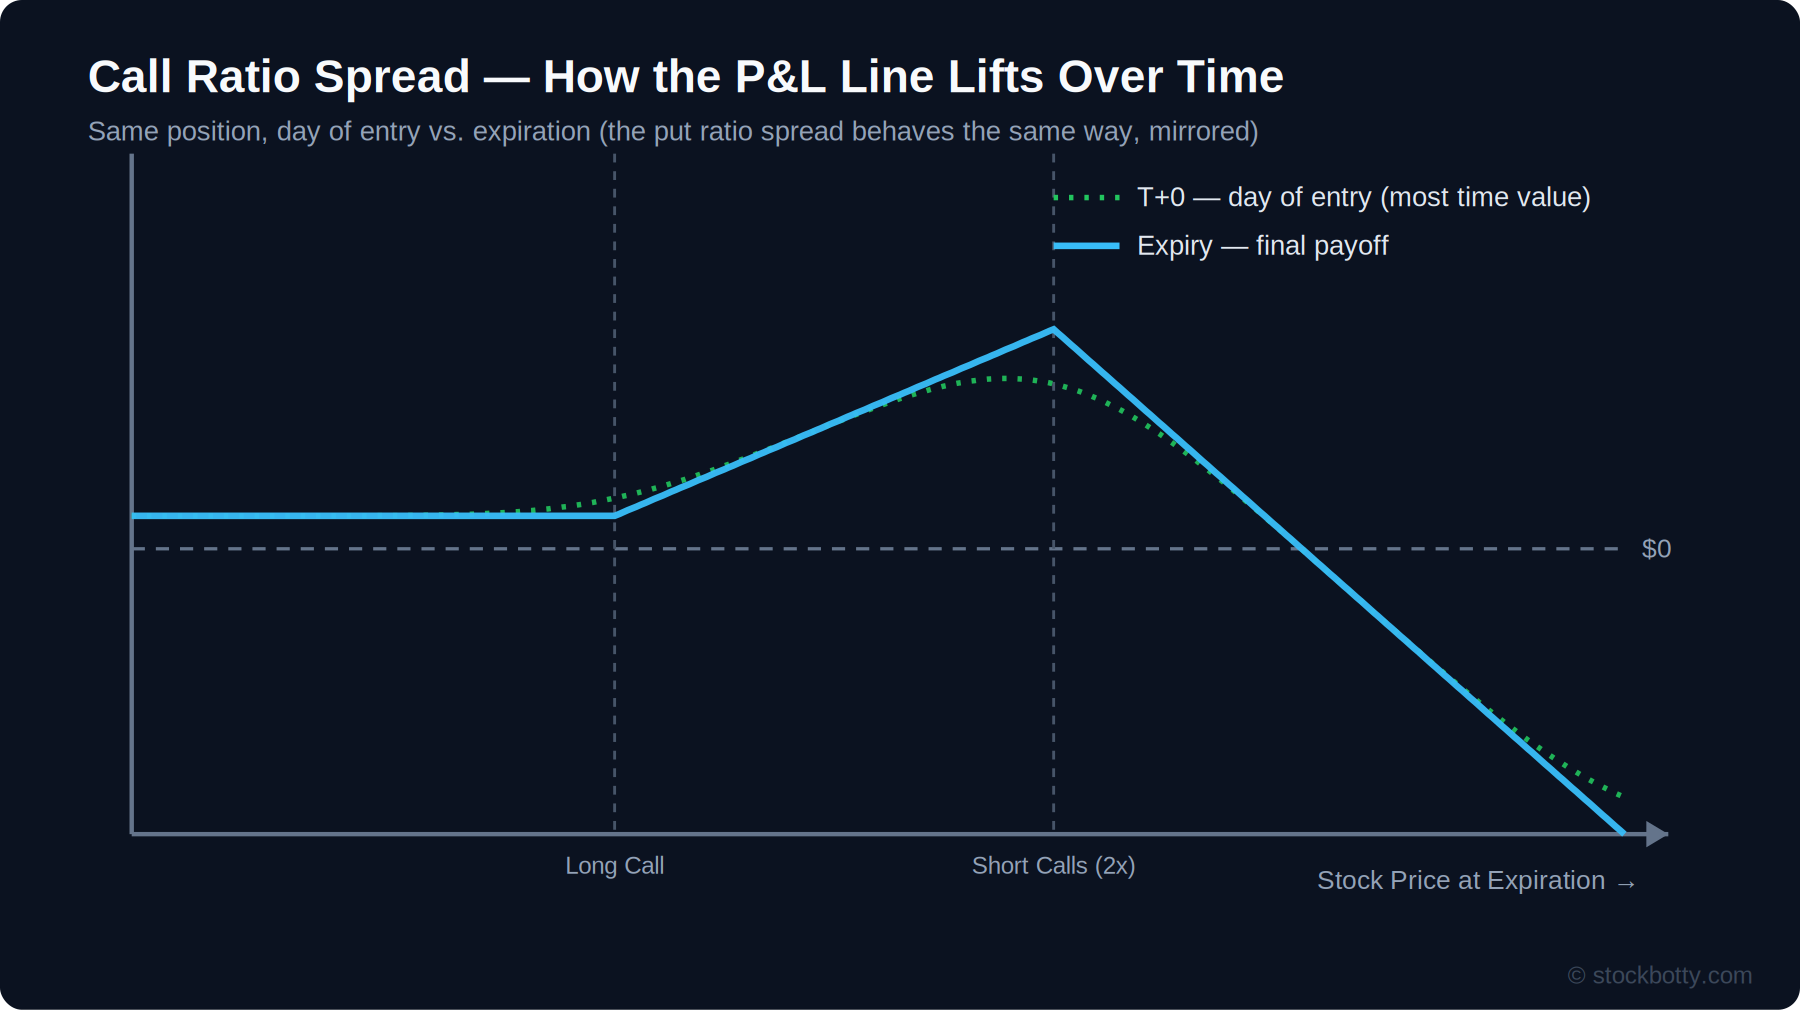
The sharp peak-and-drop shape above only describes the position on the exact day of expiration. Before that, the position follows a rounder T+0 line that reflects the time value still left in all three contracts. Early in the trade’s life, the profit zone near the short strikes is far less pronounced, and the transition into the uncapped-risk zone is more gradual rather than a hard kink.
This matters most on the risk side: a stock that has moved past the short strikes early in the trade’s life is not yet showing the full extent of the eventual loss, since time value is still cushioning the short options. That cushion shrinks as expiration approaches – which is part of why the uncapped side needs to be watched and managed well before expiration, not just when the final payoff shape is fully in effect.
Greeks and Volatility Behavior
- Theta (time decay): generally positive within the profit zone between the strikes, since the position is net short more contracts than it’s long.
- Vega (volatility): can be either net long or net short vega depending on how the strikes are chosen relative to the current price – this is less straightforward than a simple credit spread and worth checking explicitly rather than assuming.
-
⚡ Important: because a ratio spread’s vega sign isn’t always obvious from the structure alone, a volatility spike can either help or hurt the position depending on where the stock is trading relative to the strikes at the time – don’t assume it behaves like a simple short-premium trade in every scenario.
- Delta (direction): starts out modestly directional (bullish for a call ratio spread, bearish for a put ratio spread) and can flip sign as the stock approaches and passes the short strikes, since the extra short contract begins to dominate.
- Gamma (acceleration): significant near the short strikes, and more pronounced than in a standard vertical spread because of the extra uncovered contract. In the final one to two weeks before expiration, gamma near the short strikes can accelerate losses quickly once the stock is trading past the peak-profit point.
-
⚡ Important: the uncovered short contract means gamma risk on a ratio spread is generally sharper than on a simple credit spread of the same width. Many traders manage or close the position well before the final two weeks if the stock is anywhere near the short strikes, rather than holding through the sharpest part of the risk curve.
Example Trade
Call ratio spread: stock trading at $100. Buy the 105-strike call for $3.00 ($300), sell two 112-strike calls for $1.60 each ($320 total). Net credit: $20 per spread.
- Max profit: at $112, roughly $700 (the $7 spread width, ×100, plus the $20 credit)
- Below $105: keep the small $20 credit
- Above the upper breakeven (roughly $119): losses grow without limit as the stock keeps rising
Put ratio spread: stock trading at $100. Buy the 95-strike put for $2.50 ($250), sell two 88-strike puts for $1.40 each ($280 total). Net credit: $30 per spread.
- Max profit: at $88, roughly $730 (the $7 spread width, ×100, plus the $30 credit)
- Above $95: keep the small $30 credit
- Below the lower breakeven (roughly $81): losses grow rapidly as the stock keeps falling
Pros and Cons
Pros: can be opened for a net credit, benefits from time decay within the profit zone, flexible strike selection lets the profit zone be tuned to a specific price target, more capital-efficient than buying a single option outright for the same directional view.
Cons: uncapped (or very large) risk beyond the short strikes, requires active management rather than set-and-forget, margin/buying power requirements are higher than a simple defined-risk spread, three total contracts mean more complex execution and adjustment than a two-leg spread.
⚠ Risks Beyond the Basics
The uncapped risk is the headline risk of a ratio spread, but a few others don’t show up until you’re actually managing the position.
The “free trade” framing hides real tail risk
Because ratio spreads are often marketed or thought of as “free” when opened for a credit, it’s easy to underweight how large the loss can get if the stock makes a big move past the short strikes. A small credit collected up front does not change the size of the tail risk – it only offsets it slightly at the very edge of the safe zone.
Margin and buying power requirements
Because one of the short contracts is uncovered, brokers require margin for that leg similar to a naked short option, not just the defined risk of a simple spread. This ties up meaningfully more buying power than the credit received would suggest, and margin requirements can increase further if the stock moves toward the short strikes.
Assignment and pin risk on the short strikes
With two short contracts at the same strike, early assignment (American-style equity options) can affect only part of the position, leaving an uneven, harder-to-manage remainder. This is more disruptive than assignment on a simple one-for-one spread, where both legs are matched.
Execution and leg risk on a 3-contract structure
Filling 1 long and 2 short contracts as a single ratio order is standard, but on less liquid underlyings the combined bid-ask spread across three legs can erode the credit more than a simple two-leg spread would. Rolling or adjusting later means repricing three legs at once, not two.
Vega sign isn’t always what it looks like
Unlike a simple short strangle or iron condor, a ratio spread’s net vega depends on the specific strikes and ratio chosen, and can shift as the stock moves. Assuming it always benefits from falling IV, the way a straightforward credit spread does, can lead to surprises during a volatility event.
Frequently Asked Questions
What does the 1×2 in a ratio spread mean?
It refers to the ratio of contracts: 1 option bought at a closer strike against 2 options sold at a further strike, both the same type (calls or puts) and expiration. The extra short contract is what creates the uncapped risk beyond the second strike.
Is a ratio spread bullish or bearish?
A call ratio spread is moderately bullish: it profits most if the stock rises to the short strike, but loses if it rises much further. A put ratio spread is moderately bearish: it profits most if the stock falls to the short strike, but loses heavily if it falls much further.
Can a ratio spread be opened for a credit?
Yes, and many traders specifically aim for a net credit or cost-neutral construction, since the extra short option generates more premium than the long option costs when strikes are chosen carefully. A credit means the worst-case scenario on the safe side still keeps a small profit.
What is the maximum risk on a call ratio spread?
Theoretically unlimited, since the position is net short one uncovered call above the upper breakeven and a stock’s price can rise without limit.
What is the maximum risk on a put ratio spread?
Very large but technically bounded, since a stock’s price cannot fall below zero. In practice the potential loss is large enough that it is treated the same way as an uncapped risk when sizing the position.
How do you manage the uncapped side of a ratio spread?
Common approaches include closing or rolling the position once the stock approaches the short strikes, converting the extra short option into a covered position, or buying a further out option to cap the tail risk, which turns the trade into a butterfly or condor-like structure.